~/dev/myproject/src/main/java/com/example/foo $ cd ..
~/dev/myproject/src/main/java/com/example $ cd ..
~/dev/myproject/src/main/java/com $ cd ..
~/dev/myproject/src/main/java $ cd ../../..
~/dev/myproject $
This following Bash shell function, which is called pom.. (yes with two dots in the name), will allow you to navigate up to the closest ancestor directory containing a pom.xml file (closest module) with one command. Put it in your ~/.bashrc:
function pom..() {
    local start_dir="$(pwd)" prev_dir= rel_dir="$1"
    while [ "$prev_dir" != "$(pwd)" ]; do
        prev_dir="$(pwd)"
        cd ..
        if [ -f pom.xml ]; then
            if [ -d "$rel_dir" ]; then
                cd "$rel_dir"
            elif [ "$rel_dir" ]; then
                echo >&2 "Directory not found relative to pom.xml: $(pwd)/$rel_dir"
                cd "$start_dir"
                return 1
            fi
            pwd|sed "s#^$HOME#~#"
            return 0
        fi
    done
    echo >&2 "No pom.xml found in ancestor directories."
    cd "$start_dir"
    return 1
}
So you don’t have to waste any more time typing “cd ..” multiple times when navigating upwards to a Maven module root on the command line. Just type pom.. once.
The strategy will work for any style of hierarchically organized source code project where a typical marker file or directory exists at certain source code roots. Just be creative and modify the code.
Also, see this post for a more general approach to project directory navigation.
Recently I did a little experiment to learn more about non-blocking I/O on the JVM, using classes from the java.nio package. This has up until recently been unexplored territory for me, except for occasional use of the java.nio.ByteBuffer and file channel classes. It is interesting to see what kind of performance you can get out of a single thread serving thousands of concurrent clients, and letting the operating system do all the heavy lifting of multiplexing the I/O requests. Traditionally, you would write a server using dedicated per client threads, which all block and wait while communicating with a client, while the main thread is only responsible for accepting new clients and manage the other threads.
This post will go through the main server code and explain in detail, mostly so that I can look back at it later for reference. All the code is available in a Codeberg repository: nioserver.
The service
The experiment implements a server that functions solely as a receiver of messages over TCP, while also storing those messages in memory and allowing other code to fetch them concurrently. It can support any number of clients, and a client can send any number of messages. The messages themselves are variable length UTF-8 encoded strings, and the stream protocol requires each of them to be ended by a single null byte (an end message marker).
The server code
The server is implemented in file NIOServer.kt. It is all written in Kotlin.
class NIOServer: Runnable, AutoCloseable {
The server class implements Runnable to become the target of a dedicated Java thread, while also implementing AutoCloseable to enable Kotlin use { } blocks with server instances.
Constructor and server initialization
  constructor(host: String = "localhost",
              port: Int = 0,
              receiveBufferSize: Int = 32 * 1024,
              messageStoreCapacity: Int = 1024,
              acceptBacklog: Int = 100000) {
Update 2023: added parameter acceptBacklog for adjusting the size of socket accept backlog to the server code. This is important when there are lots of concurrent clients. If the server is too busy, new connects are queued by the operating system before they are accepted. This queue is limited in size and needs to be higher than operating system defaults for the server code to pass the heavily multihreaded test in NIOServerTests.
By default, server instances will listen on some free port on localhost. It allows adjusting the per client message reception buffer size, which impacts server memory usage, and one can also adjust the maximum number of decoded messages the server will queue in memory (as String objects).
    recvBufSize = receiveBufferSize
    messages = ArrayBlockingQueue(messageStoreCapacity)
    selector = Selector.open()
    serverSocket = ServerSocketChannel.open().apply {
      bind(InetSocketAddress(host, port), acceptBacklog)
      configureBlocking(false)
      register(selector, SelectionKey.OP_ACCEPT)
    }

    // Server runs in a single dedicated daemon thread
    Thread(this).apply {
      name = "NIOServer-thread-${getPort()}"
      isDaemon = true
      start()
    }

  }
The rest of the constructor initializes various networking objects. It binds the server socket, opens a java.nio.channels.Selector and registers the server channel for client accept requests, then immediately starts the server daemon thread so that clients can connect. Importantly we configure the java.nio.channels.ServerSocketChannel as non-blocking, which is not the default.
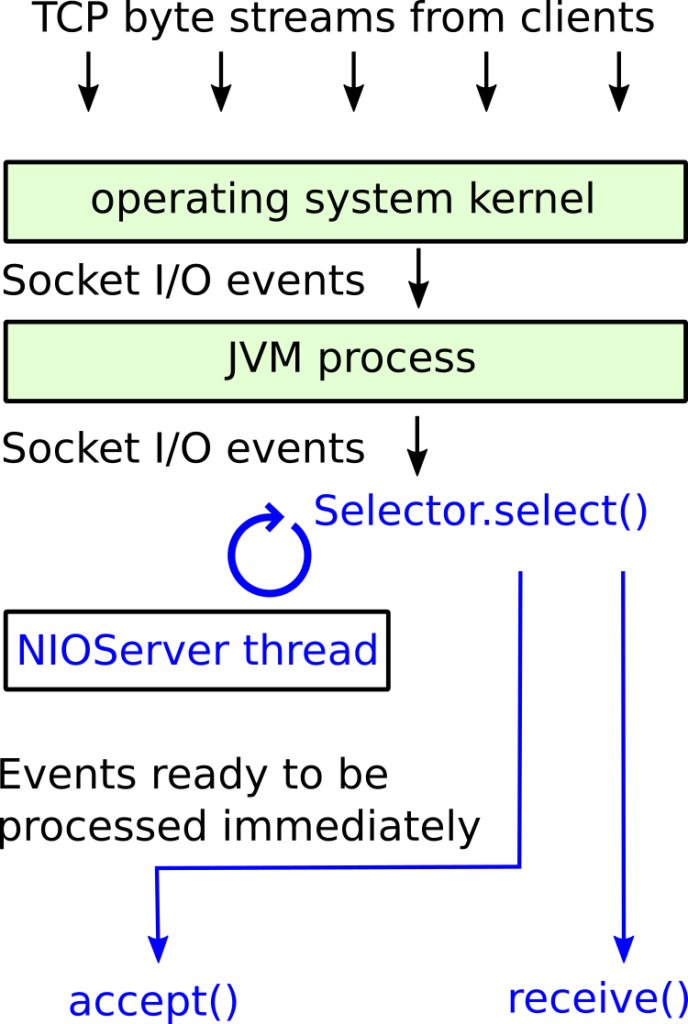
The selector is what enables the single server thread to handle many clients simultaneously in an efficient manner. It allows the server code to react to I/O events from the operating system that are ready to be processed immediately without blocking.
Main event loop
After the server instance is constructed, it will be possible to connect to the port it is bound to. If we follow the server side code flow, we jump to the run() method which the server daemon thread executes:
This is the server main event loop, which runs until the server selector is closed. From this point on, the selector is what drives the server code to do useful things. This server can do only two things:
Accept new clients that connect to it.
Receive messages from connected clients.
When either of these two events happen, the selector will make the event available via the select() call, which is where server thread rests when it is idle.
For anything to start happening, a client needs to connect. Initially, only one channel is registered with the selector, and that is the server socket channel which accepts new connections. When a client connects, the selector will signal that the server socket channel is ready for a non-blocking accept of a new client, via its java.nio.channels.SelectionKey. A selection key can be described as a handle specific to a single channel, and from it you can query what kind of non-blocking operations are ready and access the channel instance itself. Notice that the server does not need any data structures of its own to keep track of individual clients, everything is hidden behind the selector and the selection keys it provides.
The server handles client connects and data reads through local Kotlin extension functions on the SelectionKey class, since these are both events which are specific to a single client.
Event driven server code diagram
The following diagram shows how events propagate from network activity through the kernel and JVM, and then how they are serially processed non-blocking by the single server thread as they become ready.
Figure 1: event driven worker thread
Accepting new clients
private fun SelectionKey.acceptClient() {
  val clientChannel = (channel() as ServerSocketChannel).accept()

  clientChannel.configureBlocking(false)

  clientChannel.register(selector,SelectionKey.OP_READ)
   .attach(ByteBuffer.allocate(recvBufSize))
}
The server code for accepting a new client is rather simple. It gains access to the server socket channel through the selection key channel() method, which it uses to actually call accept(). The result of the accept call is a client channel, which can be used to communicate with the client. Here we ensure the client channel is configured as non-blocking, and we then register the channel in our selector for read operations. (This server never writes back to clients.)
In addition to registering the client channel, we attach an allocated ByteBuffer to the returned client SelectionKey instance. Selection key attachments can be any object which your code requires to be associated with a client channel.
Receiving messages from client
After a client has been registered with the server selector, the server can begin reading whatever the client sends.
private fun SelectionKey.receive() {
  val channel = channel() as SocketChannel
  val buffer = attachment() as ByteBuffer
The message reception is handled by the SelectionKey.receive() extension function, which is called whenever data can be received from a client without blocking. Both the client channel and the client specific buffer are accessible via the selection key, as can be seen above. The main job of this function is to read bytes from the client channel, extract and decode messages present in the stream, and store those messages in a queue. Also, when a client disconnects, the receive function will unregister it from the selector and close the channel.
ByteBuffer basics
The ByteBuffer class is typically used for data exchange when reading or writing data to channels. I think of it as a very convenient wrapper around a piece of memory (a byte[] array), although its inner workings are more complex. It also functions as an abstraction around native operating system memory allocation and memory mapped files, but neither of these advanced features are relevant for this project.
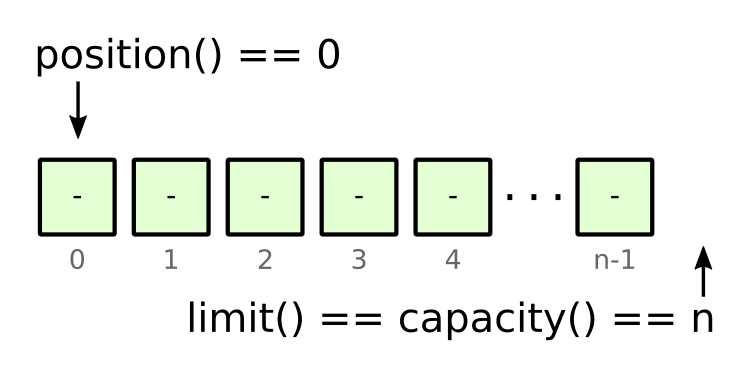
We create an initially empty ByteBuffer by using allocate(n), where n is the desired number of bytes the buffer can hold – its capacity(). Initially when empty, this buffer’s position() will be 0, and its limit() will be equal to its capacity(). These concepts are essential to understanding how to use it and the other methods it provides.
Figure 2: initial empty ByteBuffer of size n.
The limit() functions as a marker and is not always equal to the capacity() of the buffer, as we shall see. When writing to the buffer, the limit tells how far you should write bytes, and when reading it tells how far you should read before stopping.
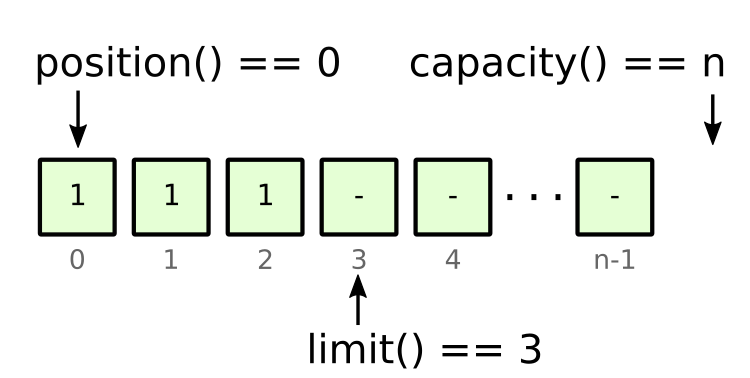
We can write data into the buffer in several different ways, but here we will focus only on perhaps the simplest form: a relative put (write) operation. Assuming we write three byte values into the buffer by invoking put(1) three times, we end up in the following state:
Figure 3: state after having written three bytes into the buffer
Each put() writes a byte into the current position, then advances the position by one. When the position reaches the limit(), no more bytes can be written.
Following a series of writes, the next typical thing to do would be to read those bytes out of the buffer. Again, there are several ways to do this, but we will focus on simple get() calls, reading one byte at a time. Since get() just reads from the current position, we cannot call it immediately after the put() calls, because we would get the byte at position 3, which is just an undefined zero. This is where the flip() method comes into play, which sets the limit to the current position and the position back to zero:
Figure 4: state after flipping the ByteBuffer
Now we can invoke get() three times to read the first three bytes back. For each call, the byte at the current position is returned and the position is advanced by one. The hasRemaining() method can be used to check if there are bytes left to read (or space left to write into) between the position and the limit. It will return true as long as the position is smaller than the limit.
When working with channels, you will often pass around ByteBuffer instances and do bulk read or write calls, meaning that you don’t have to deal with each byte on its own, but rather read/write some amount of bytes (often unknown in advance). This is typically also more efficient. The position, limit and capacity of the ByteBuffer still behave in the exact same way as described in this section.
Lastly, to prepare the buffer for future writes into it, we can clear() it. This would put the buffer back into the following state:
Figure 5: state after the buffer has been cleared
Notice that it is basically like the state in figure 2, except that there are still 1’s written into the first three cells. So a clear is just marker updates and no actual zeroing of memory. Future writes will just overwrite the old garbage bytes, and the position and limit will keep track of the number of valid bytes.
Back to the NIOServer message reception code
Now that we know some basics about the ByteBuffer, let’s go back to the message reception code in NIOServer. We start by reading however many bytes the client channel has to offer us:
  try {
    val read = channel.read(buffer)
    if (read == 0) {
      return
    }
Update 2023: added check for zero read bytes here. If no bytes were read into buffer, there is no point in processing the reception event further.
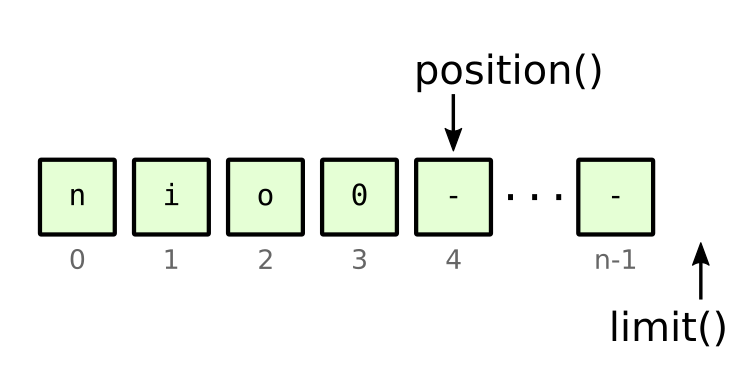
We do this by passing our ByteBuffer instance to channel.read(), which actually writes into the buffer. The method returns the number of bytes read, which may be zero, and we store that in variable read. The following figure shows how the buffer may look after a read of 4 bytes:
Figure 6: buffer after reading 4 bytes from client channel
Next we need to scan our buffer for messages. From the example above, the buffer contains one complete message "nio" ended with a null byte. The logic is built to handle zero or more complete messages in the buffer after a single client read.
    var i = 0
    while (i < buffer.position()) {
      if (buffer.get(i) == END_MESSAGE_MARKER) {
        storeMessage(buffer.duplicate().position(i).flip())
        buffer.limit(buffer.position()).position(i + 1).compact()
        i = 0
      } else i += 1
    }
We always start at the beginning of the buffer and scan for the next end message marker byte, but never beyond the buffer position, which tells us where the client channel stopped writing into the buffer. When an end message null byte is found, we first pass a duplicate().position(i).flip() of the client byte buffer to the storeMessage() method. This is only a shallow copy of the buffer, sharing the same memory allocation, but with its own set of markers. We adjust it so the buffer is suitable for reading the exact part that contains the next message, excluding the null byte. The adjusted buffer will have the following state:
Figure 7: state of ephemeral ByteBuffer duplicate used for message decoding
The storeMessage() method simply reads from the provided buffer from position to limit and decodes the bytes as UTF-8, then stores the string message in an internal queue. Next we reset scanning state and remove the decoded message bytes from the client reception buffer, to free up space:
buffer.limit(buffer.position()).position(i + 1).compact()
i = 0
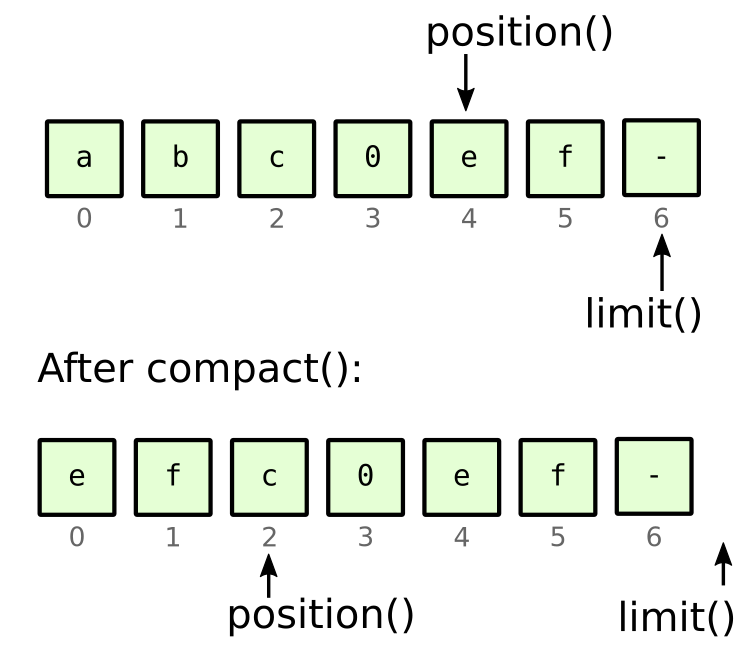
We set limit marker on the current position, which at this stage tells us where the client channel stopped writing into the buffer as a whole. Then position is updated to one beyond the end message null byte marker, and lastly the buffer is compacted. The following figure illustrates the effect of buffer compaction in general:
Figure 8: the effect of the compact() operation
After compaction the buffer is actually setup for more writing from client channel, and we keep only the so far unprocessed bytes, which are copied to the beginning of the buffer. However the scanning loop runs until there are no more complete messages present in the buffer or end of client written bytes is reached.
    if (!buffer.hasRemaining()) {
      log("error: client buffer overflow, too big message, discarding buffer")
      buffer.clear()
    }
If no complete message has been read from the buffer and it is also full, the server enforces a limitation and discards the buffer, for reasons of simplicity. Other ways to handle this could be to dynamically grow the client buffer.
    if (read == -1) {
      if (buffer.position() > 0) {
        storeMessage(buffer.flip())
      }
      cancel()
      channel.close()
    }
Finally, the last part of SelectionKey.receive() code is responsible for closing client channels, which is triggered by the read call returning -1. If there are remaining unprocessed bytes, those are stored as a last message from the client before closing the channel and cancelling the selection key. (I am not sure if it is necessary to do both.)
Thread safety
Since there is only a single thread running in the server code, thread safety is not required. However this server allows other threads to concurrently fetch messages from an in-memory queue and uses java.util.concurrent.ArrayBlockingQueue for this purpose. This allows any number of external threads to safely fetch messages from a single NIOServer instance concurrently while the server thread itself is adding new incoming messages to the queue.
Automated tests
Test cases are implemented in the class NIOServerTests.kt. Perhaps the most interesting case is the last one, which spawns 1000 threads concurrently connecting and sending messages, then asserting that the correct number of messages were received by the server.
Notes about performance
As this was only an experiment, not much effort has been put into optimizing the code. The message scanning could be made more efficient by avoiding re-scan from the start of the buffer at every receive(), perhaps by using the mark() method of ByteBuffer to remember the current scan position. Also, the number of buffer compact() operations could be reduced to at most one.
Closing
We will mark the end of this lengthy blog post by showing the code that closes down the server cleanly:
override fun close() {
  selector.close()
  serverSocket.close()
}
When the selector is closed, the server thread stops looping and dies.
I’ve brushed up a handy tool I wrote a few years ago. It allows quick inspection of Maven pom.xml files on the command line, producing human readable plain text output. If you’ve ever found yourself grepping pom.xml files for version numbers or other bits of information, you might find it useful. Check it out on Codeberg: https://codeberg.org/oyvindstegard/pom